|

|
|
PolyNet
NG __________________________________________________________________________ PolyNet NG is a
programmable icon bar able to display Gif anims, Amiga icons, and also PNG
icons. It has a wealth of customizable option like true type support,
creation of bars within bars, between many other never seen features in
other similar amiga programs. Its official homepage can
be found here PolyNet NG is a beautifull
odd looking beast that unfortunately comes with no manual. It is very hard
and unforgiving for newcomers to understand it, so this is my attempt to
facilitate that journey. SOFTWARE REQUIREMENTS: 1.AmigaOS 3.5 or better
already installed. 2.Magic User Interface 3.8 (mui 3.8). 3.Either Picasso96 or CyberGraphX, RTG systems. QUICK INSTALLATION: Download THIS archive and follow the instructions
that are inside of it. If you choose this path you
can now skip the MANUAL INSTALLATION and the HOW TO RUN IT sections. Just
jumpt to the MAIN CONCEPTS section. MANUAL INSTALLATION: 1. Get the following files: popupmenu.library 10.8.6
(Only choose one option from the urls below according to your system’s
processor) 2.From WBStart.lha only
install wbstart.library to your Libs: volume. 3.From pmlib.lha (or any of
its other cpu variants) only install popupmenu.library to your Libs:
volume. 4.Unpack
PolyNetNG_1.31_68k.lha and place the entire drawer in your harddisk to
somewhere you would like. 5.Now you will have a
drawer named Poly_Net_NG with the program and its complementary files
inside it. 6.Unpack
PolyNetNG_Common.lha to the exact same place you extracted
PolyNetNG_1.31_68k.lha. 7.Move
Poly_Net_NG/libs/ttengine.library to your Libs: volume. 8.Move Poly_Net_NG/mui/ the
files BWin.mcc, BWin.mcp, GIFAnim.mcc and Guigfx.mcc to where you store
your mui custom clasess. Congratulations, now
PolyNet NG is ready to run! HOW TO RUN IT: You can execute it as any other amiga program by double
clicking on its icon. Alternatively you can run
it from the WBStartup folder so that it gets activated everytime your
machine boots. For this purpose you will need to create a text file
containing only the following single line of text: WBRUN
SYS:Tools/Poly_Net_NG/Poly_Net This is assuming you have
the PolyNetNG is in your Tools drawer. If not, you are welcome to adjust
that path to its actual location. You will also need to make sure you have
this text file’s icon, set as “Project” type icon with IconX as its default
tool. Remember to add the tooltype DONOTWAIT so that it doesnt halt the
entire boot process. MAIN CONCEPTS:
A bar is comprised of
several elements: There are 3 configuration
menus, some of their items are replicated within them for user convenience.
To access any of them you need to first
click with the left mouse button the dragbar area.
Then depending on the place you click the right mouse button one of the 3
configuration menus will appear.
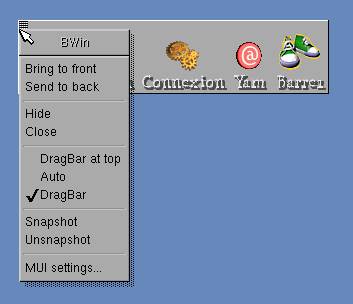
The "BWin" (also known as Window settings) is activated
if you click over the dragbar with the right
mouse button. This is a pop up menu.
The "Main menu"
settings is activated if you click in an empty area of your workbench
desktop. This is a pull-down menu.
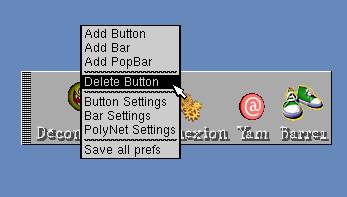
The "Bar menu" is
activated if you click anywhere in the bar (but not in the dragbar). This is a pop up menu. BASIC OPERATION: To create a completely new
bar, go to the Main menu and select "Bar" and then
"New". A default bar with a trashcan will appear. You can now
start to modify this bar to your liking. If however, somehow you regret the
idea, you can always click on the trashcan button and the bar will dissapear completely. To Move a bar, click over
the dragbar, and drag it to your desire screen
location. To fix the new position you have chosen for a bar, access the
"BWin" menu and select
"Snapshot". To add or remove a button
access the "Bar menu" and choose the option you desire. Some drag
and drop icon operations are posible when you add
or modify a button. To create a bar inside
another bar (PopBar), just access the "Bar
Menu" from the button that will activate it, and choose "Add PopBar". An empty default bar with a trashcan will
appear. You can then modify this PopBar by adding
and removing buttons like any normal bar. Remember that everytime after you do any modifications you need to
save your work. For this purpose access the Main menu, then go to
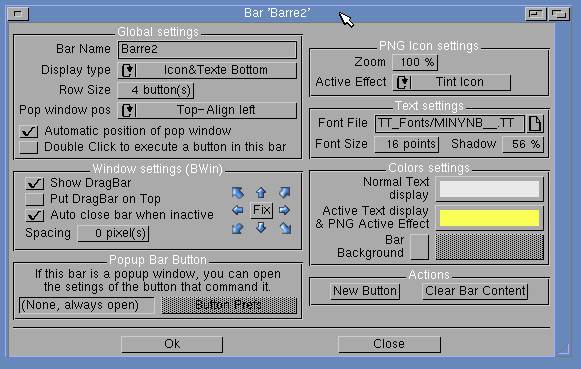
"Project" and select "Save all". POLYNET SETTINGS: From the Main menu,
selecting Bar, the option named PolyNet Settings
will appear. Selecting this particular option will allow you to customize
any bar.
You will see two big pannels. The left panel is for setting arexx modules to make use of the arexx
port that particular program may have, and thus access its functions from PolyNet. The right panel has all the bars and popbars available numerically in order to select them
for adjusting its settings.
As you can see from the
picture above, each bar and popbar can have its
individual settings modified to suit your needs. ADVANCED CUSTOMIZATION: Inside Poly_net_NG
drawer you will find the following content worth mentioning: TTF_Fonts (drawer) Anims (drawer) Poly_Net (file) |